Table of Contents
Synthetic Stereo & 3-D Rocking
Overview
Stereo and rocking are powerful ways to show off the 3D structure of your subjects. With Zerene Stacker, they are now also easy! Instead of shooting a separate stack for each viewing angle, Zerene Stacker allows you to shoot a single stack and then use synthetic rotation to make multiple images that can become a stereo pair, a rocking animation, even rocking stereo.
In Zerene Stacker, this capability to do synthetic stereo and 3-D rocking from a single stack works well with a wide variety of subjects, including those with transparency, strong overlaps, bristles, and so on, that often cause problems for other packages.
Some Examples
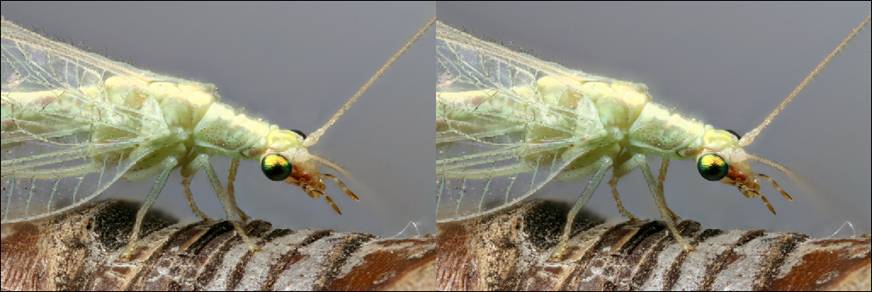
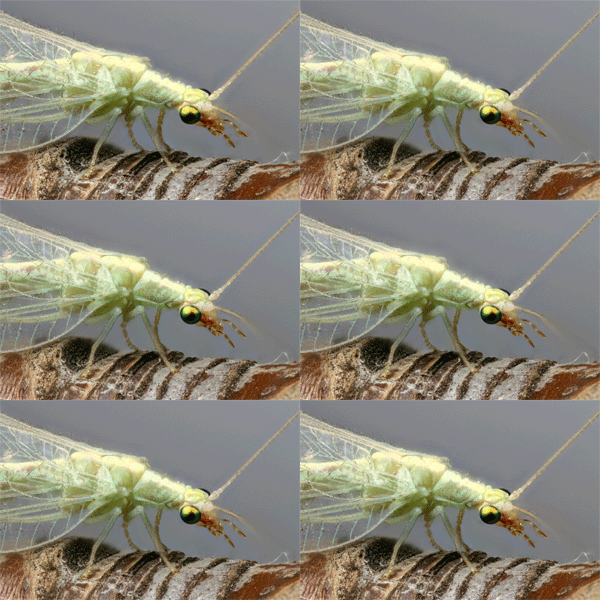
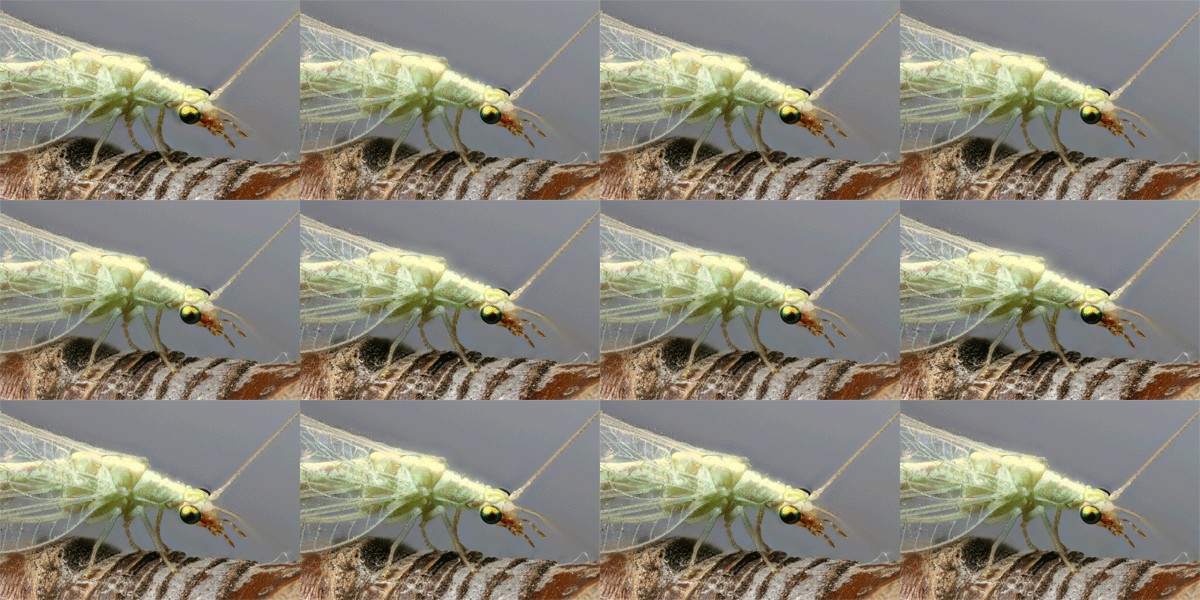
These images were made from a single 82-frame stack of a green lacewing.
First, here is a side-by-side stereo display of the full frame (crossed-eye layout).
Second, here is a rocking version. (If it’s not rocking, please click on the image and wait for a 0.5 MB download. Also be sure that your browser is set to allow GIF animation).
Third, a rocking stereo (crossed-eye, and again, click if it’s not rocking).
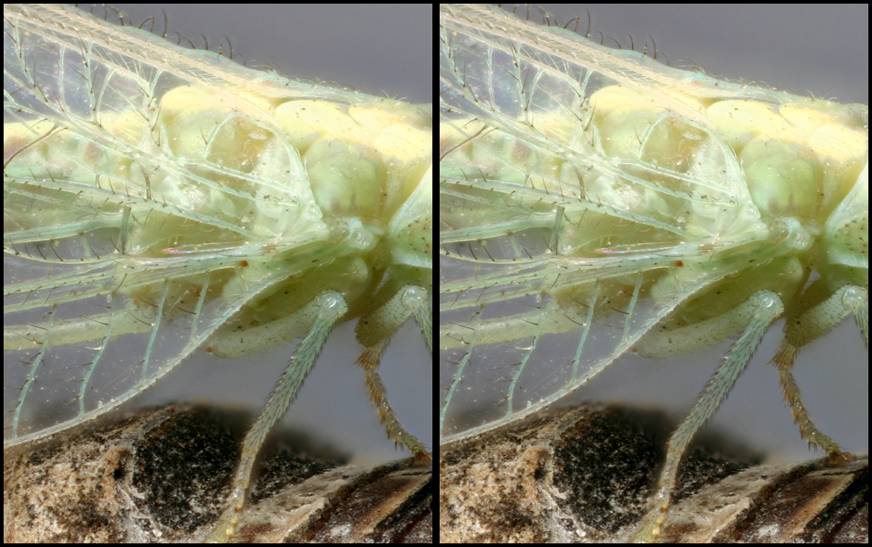
Finally, a side-by-side stereo display of a smaller part of the frame (again, crossed-eye layout).
How Is This Done?
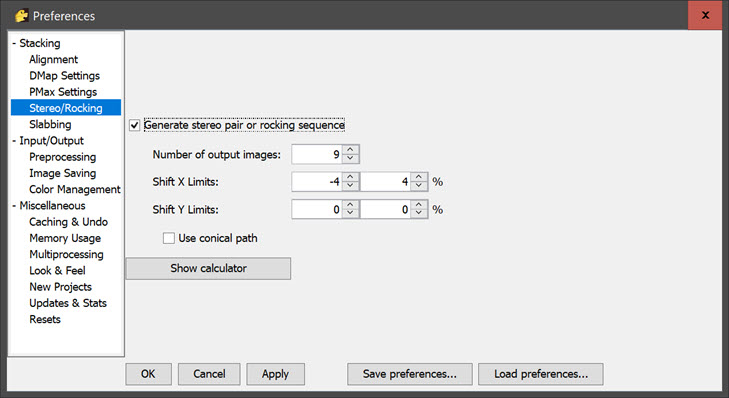
In the menus at Options > Preferences > Stereo/Rocking, you’ll see a control panel that looks like this:
When you check the box for “Generate stereo pair or rocking sequence”, you change the behavior of PMax and DMap stacking operations. Normally, each of those operations creates one output image by aligning and stacking the source files. But when the box is checked, PMax and DMap shift each image a little bit just before accumulating it into the stacked output. The shift is varied throughout the stack in such a way that the final image looks as if the stack had been shot from a different angle. Two or more of these images can be combined to make a stereo pair, a rocking animation, and so on.
When the panel is set as shown above, each execution of PMax or DMap will generate 9 output images, varying the maximum X shift in uniform increments from -4% to +4%. (You can type in any values you choose.)
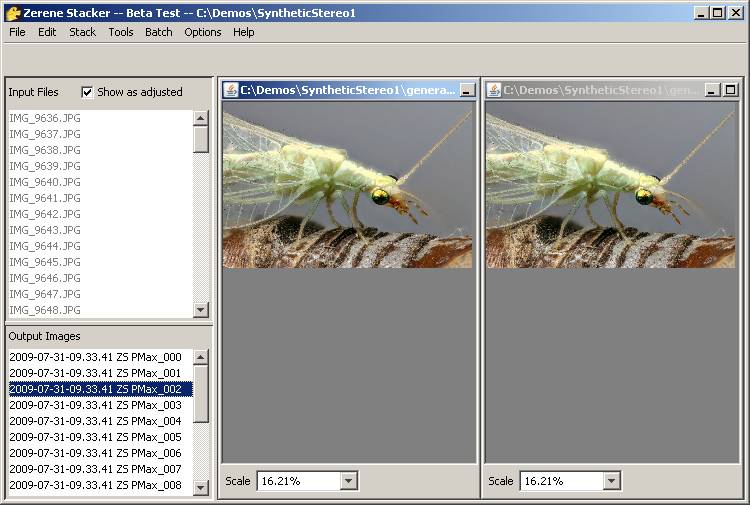
Different stacks will need different shifts to make a good looking stereo pair. To help in finding a good shift, Zerene Stacker provides a simple stereo previewing facility. Just go to Tools > Stereo… > Start Preview. This will set up two side-by-side synchronized windows that act like Retouching except that there’s no brush and you can choose whatever output image you want in either window. Just click on the window, then click on an entry in the Output Images list. Repeat for the other window, and adjust your selections until the two images work well together.
Note that for some stacks the images may initially appear in the wrong order, so that depth is inverted. In that case, you can reverse the order of the images in preview with four mouse clicks: select left window, select the Output Image to appear in the left window, select right window, select Output Image to appear in the right window. If you consistently find that you need to reverse the order in preview, you can also change Preferences so that the images are created in the opposite order to start with. Simply go to Options > Preferences > Stereo/Rocking and swap the values for first and last image shifts. For example if -3,+3 produces images in reversed order, then swap them to be +3,-3.
Here is what the screen looked like when Stereo Previewing the sample shown above. The left window is showing image _002, as indicated by the highlighted title bar and highlighted image name. The right window happens to be showing image _006, although we can’t tell that from this screen capture.
These two images happen to make a good crossed-eye stereo pair.
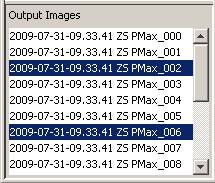
When we Tools > Stereo… > Stop Preview, the screen is left with the previewed images selected:
At this point, we can Tools > Stereo… > Make Stereo Pair(s), to make a single output image containing the two views in a side-by-side layout as shown by the preview. This image can be saved as usual.
To generate a sequence of stereo pairs, simply select all the output images that will be involved and again Tools > Stereo… > Make Stereo Pairs(). Zerene Stacker will then step through the list of selected output images, using the offset that was most recently selected by Stereo Preview. In the current example the offset is 4 images, so if we select _000 through _008, then we get _000 paired with _004; _001 paired with _005; and so on through _004 paired with _008.
The built-in command Tools > Stereo… > Make Stereo Pair(s) creates a plain side-by-side pair, either crossed-eye or parallel viewing depending on how you selected the images.
To produce any other format, you must use some external program. The free software StereoPhoto Maker (http://stereo.jpn.org/eng/stphmkr/) allows cropping and can generate output in a wide variety of formats, including color anaglyphs for viewing with red/cyan or red/green glasses. Animated GIF images for rocking displays can be generated by programs such as Adobe’s ImageReady and the free GIMP software (http://www.gimp.org/). It can also be done with regular Adobe Photoshop, using Timeline animation as described at https://helpx.adobe.com/photoshop/how-to/make-animated-gif.html. Longer sequences can be generated as looping movies, by programs such as Apple’s QuickTime Player Pro (http://www.apple.com/quicktime/pro/, for Macintosh or Windows).
Tips For Best Results
The best shifts to use depend on your application and preferences. For our test stacks, values of +-2% or +-3% often work well.
In some cases, you may wish to use a one-sided shift such as 0% and 4%. This will generate one highest quality image (at 0%), paired with a somewhat degraded partner (at 4%). Stereo depth perception is generally very tolerant of fuzzy images, so this approach works well with most people. However, it is somewhat risky. In some people one eye is strongly dominant, and they won’t like the result if their strong eye happens to match up with the degraded image.
In most cases, Options > Preferences > Preprocessing > Image Pre-sizing can be used to reduce your processing time. It is rare to display a stereo pair at anything approaching full camera resolution. By pre-sizing your images to 50% or even smaller, you can reduce processing time to a small fraction of what it would be with full-size images, while making little or no change in the final result.
For repeated use with similar subjects, you can also save some time by generating only the images you really need, as opposed to a group of images to choose between. First, find a good pair of shifts using the approach described above. In the example, we made 9 images from -4% to +4%, so the shifts were -4%, -3%, -2%, …, +2%, +3%, +4%. We found that the best pair used images _002 and _006, corresponding to shifts of -2% and +2%. To do more stacks of a similar type, we would set Options > Preferences > Stereo/Rocking to make just 2 images with a “First image maximum shift” of -2% and a “Last image maximum shift” of +2%.
If you are on a Windows computer or have Windows emulation software, you should consider getting a copy of the free StereoPhoto Maker software (http://stereo.jpn.org/eng/stphmkr/). It provides an excellent viewer that allows displaying a single image in various display formats, including crossed-eye, parallel viewing, red-cyan anaglyphs, and many other less common forms. It also provides a variety of editing capabilities. Cropping is especially handy, since this feature is not yet built into Zerene Stacker.
When using StereoPhoto Maker, it is best to not use any of its alignment features, other than shift left/right to adjust overall depth position with respect to the display surface. All other sorts of alignment features, such as Adjust > “Auto alignment” are far more likely to introduce defects than to make any improvements. This is because those features are designed to fix certain issues that are common in camera-based stereo but never occur in Zerene Stacker synthetic stereo. In most cases StereoPhoto Maker will realize that there are no issues to fix, but in some cases it will mistakenly think that it sees a fixable problem, apply some “fix” like rolling the images, and mess things up in the process.
Retouching
In most cases you cannot retouch shifted outputs from unshifted inputs because image features will not line up correctly.
So, the key trick for retouching shifted images is to retouch shifted outputs from other outputs that were generated with the same shift.
You can use a targeted Stack Selected, or systematic batch slabbing, to generate the shifted outputs to use as source for retouching.
As a general rule, we recommend that you avoid retouching of stereo images, except to fix transparent foreground artifact. The reason for this recommendation is that any inconsistency between the two images will be glaringly obvious when viewed as a stereo pair. At the least, mismatching areas will call the viewer's attention by appearing to “flash”. At worst, if the retouching process has resulted in horizontal shifts of any patch, then in the stereo view that patch will be seen as pulled forward or pushed backward, so the apparent geometry will have been changed.
It is extremely difficult to avoid such inconsistencies when retouching each image independently, except for the special case of fixing transparent foreground artifact by retouching from Stack Selected of the foreground regions.
As a result, it often takes much more time and trouble to retouch a stereo pair than it does to retouch a single image to the same level of residual artifact.
So consider yourself warned: avoid retouching stereo images except to fix transparent foreground.
As an alternative, consider presenting your results in two forms: a retouched single image that is free of artifact but whose geometry may be unclear, combined with a stereo pair that clearly shows the geometry but may suffer from various artifacts.
Now, if you do want to proceed with retouching, then start by considering the situation.
If the artifacts to be removed are isolated to just one or a few areas, then the simplest and most efficient approach is to do targeted Stack Selected that covers just the troublesome areas. That will produce shifted outputs that do not show the transparent foreground problem, and you can retouch from the shifted Stack Selected outputs into the correspondingly shifted full stack outputs.
If the artifacts to be removed are widespread through the stack depth, then it can be more efficient to generate a large set of shifted Stack Selected outputs by using batch slabbing, as described below. However, again we note that even at its best this process takes a lot of time and trouble to do well, so we do not recommend retouching stereo pairs or multi-frame animations that have widespread artifacts.
Slabbing
In general, “slabbing” is a two-step technique in which (1) sets of adjacent original source images are focus stacked to create “slab outputs”, and then (2) the slab outputs are used as inputs to another stacking operation that puts the whole stack together. ( See Slabbing for a general discussion of slabbing.)
Slabbing is a powerful way to simplify retouching, and it is particularly helpful for fixing “transparent foreground” artifact in stereo pairs.
Used for this purpose, a good workflow for slabbing and stereo pair generation goes as follows.
(One caution: this procedure should not only be read, but followed! The procedure is long and complicated, and it is easy to go astray.)
- Launch Zerene Stacker.
- Load original source images.
- Determine two Shift X limits, one for each eye's viewpoint.
- Set general batch options:
- Menu select Options > Preferences.
- At Preferences > Alignment, be sure that appropriate options are selected.
- Set Preferences > Slabbing > “Stacking operation” to be PMax.
- Set Preferences > Slabbing > “How to save output images” to be “Keep only in project”.
- Click OK to close Preferences dialog.
- Menu select Batch > Show Batch Dialog.
- Be sure the Queued Batches area is empty. If any queued batches are present, then select and delete them.
- Close Dialog.
- Generate slab script for the first eye's viewpoint:
- Menu select Batch > Slabbing. (This will automatically open the Preferences dialog.)
- Set Preferences > Stereo/Rocking to generate one frame at the first eye's Shift X limit.
(Put a checkmark in the box to “Generate stereo pair or rocking sequence”,
and put the same negative number in both of the Shift X Limits fields.) - Set Preferences > Slab Saving > Template to be “First Eye Slab {outseq} {method}”.
- Click OK to close dialog, generate batch script, and open the Batch Queue dialog.
- Close Dialog to close the Batch Queue dialog.
- Generate slab script for the second eye's viewpoint:
- Menu select Batch > Slabbing (This will automatically open the Preferences dialog.)
- Set Preferences > Stereo/rocking to generate one frame at the second eye's Shift X limit.
(Put a checkmark in the box to “Generate stereo pair or rocking sequence”,
and put the same positive number in both of the Shift X Limits fields.) - Set Preferences > Slab Saving > Template to be “Second Eye Slab {outseq} {method}”.
- Click OK to close dialog, generate batch script, and open the Batch Queue dialog.
- Close Dialog
- Generate all slab outputs:
- Menu select Batch > Show Batch Dialog.
- Run All Batches.
- Close Dialog.
- Save slab outputs and load them as input files, already aligned:
- In the Output Images panel, select all slab outputs.
- File > Save Output Image(s), to any convenient location.
- At Options > Preferences > Preprocessing, be sure there is a checkmark on “Add files to existing project as already aligned”.
- Add slab outputs to the Input Files Panel.
- Stack selected with no added stereo shifts, to generate each eye's view for the full stack:
- Menu select Options > Preferences.
- At Stereo/Rocking, be sure there is no checkmark on “Generate stereo pair or rocking sequence”.
- At Image Saving, set Template to be “First Eye ZS {method}”.
- OK to close Preferences dialog.
- In the Input Images panel, select all First Eye images.
- Stack > Stack Selected (PMax)
- Menu select Options > Preferences
- At Image Saving, set Template to be “Second Eye ZS {method}”.
- OK to close Preferences dialog.
- In the Input Images panel, select all Second Eye images.
- Stack > Stack Selected (PMax).
The main products of this long and complicated procedure will be:
- Two output images, named “First eye ZS PMax” and “Second eye ZS PMax”.
- A collection of slab images, named “First Eye Slab …” and “Second Eye Slab …”.
These can be used to retouch the corresponding eye's main output image.
Note that when retouching, it is a good idea to set Options > Preferences > Image Saving > Template to be either “First Eye…” or “Second Eye…”, each time just before Edit > Commit. This will help to keep straight which view is which.
As already noted, the procedure is long and complicated, so there are lots of places to go astray. Most missteps will be quickly obvious, but there is one type of error that can be quite mysterious. That results from accidentally stacking with alignment and/or stereo shift added when they were not supposed to be.
In particular, it is critical that:
- “Add files to existing project as already aligned” is selected, when the slab outputs are added back to the project as Input Files. If this is not done, then Stack Selected will try to re-align the stereo-shifted slabs to match the original source images, and that will generate nonsense output.
- There must be no checkmark on “Generate stereo pair or rocking sequence”, when Stack Selected is run to combine the slabs to make full stack results. If the checkmark is left in place at this stage, then the already-shifted slabs will be stereo-shifted again. The resulting output will not be correct. However, it may look reasonable at first glance, so the first hint of this error may be that when retouching is attempted, the slab images do not align properly with the full-stack composites.
This documentation is rather new and no doubt can be improved. Please report difficulties in using it, by sending email to support@zerenesystems.com .
Calculating Shift Based On Viewing Angle
You can calculate the shift percents if you know three things:
- subjectStackWidth = frame width at the subject
- subjectStackDepth = stack depth at the subject
- viewAngle = viewing angle, measured as angular deviation from the usual straight-on view
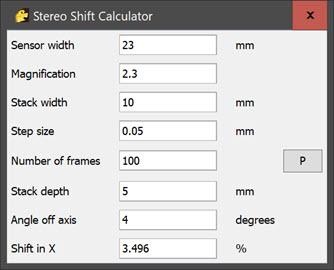
Recent versions of Zerene Stacker include a Stereo Shift Calculator, which automates the required computations.
Here is an example of its use, corresponding to the numbers shown below:
Given these values, the calculation is straightforward:
- maximumShiftInX = tan(viewAngle) * (subjectStackDepth/subjectStackWidth) * 100%
For example, if you want a viewing angle that is 4 degrees off-axis, with a stack whose frame width is 10 mm and stack depth is 5 mm, then you would calculate as follows:
- subjectStackWidth = 10
- subjectStackDepth = 5
- viewAngle = 4 degrees
- maximumShiftInX = tan(4 degrees) * (5/10) * 100% = 3.4963%
If you're doing the calculation in Excel, then remember to convert degrees to radians. The formula in Excel would be:
- =TAN(RADIANS(4)) * (5/10) * 100
For generating stereo pairs, simply use viewAngle = (plus and minus) separationAngle / 2 .
Viewing angles that are off axis vertically use the same rules, substituting height for width and Y for X. Note that this means the same angle will require different shift percents for X and Y, in proportion to the frame dimensions.
Other Resources
Some additional discussion and more example images can be found at http://www.photomacrography.net/forum/viewtopic.php?t=7819 .
For a comparison of synthetic stereo versus true stereo, see https://www.photomacrography.net/forum/viewtopic.php?t=33923 .
For a flexible browser-based stereo viewer, see https://zerenesystems.com/cms/stacker/docs/stereotools/sv1 .
Limitations
Synthetic stereo and rocking works best with longer stacks (many frames) that were shot at large aperture so that each source image has only a shallow depth of field.
Output image quality degrades for larger shifts (both positive and negative), particularly at lower magnifications and smaller apertures where there is more depth of field in each source image.
Currently, the retouching tool does not know about shifts and thus does not work well with shifted output images. This will be addressed in a future update.
However, be aware that the current version works fine to retouch between two output files that have the same shift. This use, in conjunction with Stack > Stack Selected, provides a powerful method of dealing with the “transparent foreground” problem that often appears in shifted stacks. For more information, see the tutorial Using Stack Selected to Retouch Transparent Foreground.
