Table of Contents
How To Use Zerene Stacker
Getting Started
If you are completely new to focus stacking, then perhaps it would be best to start by reading a couple of tutorials:
Otherwise, we’ll assume you already know the basics of focus stacking and have a stack of JPEG or TIFF images to work with.
Getting started with Zerene Stacker is easy:
- Start the program.
- Add source images to the list of Input Files. You can do this either with drag-and-drop from Windows Explorer or the Macintosh Finder, or with File > Add File(s) in the Zerene Stacker menus.
- Make a stacked image with Stack > Align & Stack All (PMax).
- Save the result with File > Save Output Image.
Congratulations, you have now finished your first stack using Zerene Stacker!
Here’s an example — 167 frames of a tiny fruit fly, stacked into a halo-free composite, fully automatic, no messing with parameters.
Where To Next?
From this point, there are several directions you may want to go. These include:
- Read some more of the Tutorials.
- Read through the list of FAQs.
- Try out the other major stacking method, DMap.
- Use retouching to combine the best aspects of several images.
- Save your work in a Project so you can do more retouching at a later time.
- Use the Batch facility to process multiple stacks unattended.
- Change processing options such as alignment and DMap settings.
- Change the screen layout to fit your own style of working.
- Explore advanced features like synthetic stereo.
DMap versus PMax
To get the most benefit from using Zerene Stacker, it’s important to understand the differences between its two major stacking methods.
PMax is a “pyramid” method. It is very good at finding and preserving detail even in low contrast or slightly blurred areas. It's also very good at handling overlapping structures like mats of hair and crisscrossing bristles, nicely avoiding the loss-of-detail halos typical of other stacking programs. But PMax tends to increase noise and contrast, and it can alter colors somewhat.
DMap is a “depth map” method. It does a better job keeping the original smoothness and colors, but it's not as good at finding and preserving detail.
The two methods complement each other. Some types of subjects look good when they are processed automatically by PMax, but not by DMap. Other subjects are just the opposite. For particularly challenging subjects like bugs and flowers shot through microscope objectives, neither method is ideal by itself. In that case the best results are obtained by using human judgment and the retouching tool to combine the best aspects of both algorithms.
Stacking With DMap
With default settings, DMap processing is broken into three big steps:
- Computation: the entire stack is processed to generate a draft quality depth map by analyzing local image features.
- Human judgment: the user interactively sets a “contrast threshold” that separates significant detail from irrelevant noise. This is accomplished by using a slider that provides immediate visual feedback. Areas that should be treated as irrelevant noise are shown as black during this step.
- Computation: the depth map is refined based on the contrast threshold, and from that map, the final image is constructed.
Step 2 is illustrated below.
With the contrast threshold set at Percentile: 0.0, we can see a large amount of “junk” around the edge of the subject. In other subjects, we might see unacceptable “chunky” regions even in the body of the subject. This setting is too low:
With the contrast threshold set at Percentile: 85.0, the junk has mostly disappeared, but a lot of subject detail has disappeared also. This setting is too high:
With the contrast threshold set to an intermediate level, the junk has mostly disappeared, while most of the subject detail is still retained. This setting will give a good result:
When the threshold is set properly, click the OK button and wait for the computation to finish.
If the result is not ideal, then repeat the process, using a different setting of the slider.
For example if there are blotches in background near the subject, then expand the black mask to cover those blotches, by moving the slider slightly to the right.
The DMap output from Percentile: 55.0 is shown below.
With this difficult subject, there is still some halo that must be dealt with by retouching. This can be done quickly and easily from a PMax output, as shown in the retouching tutorial.
For simpler subjects, DMap by itself with a carefully set threshold will often give final quality results.
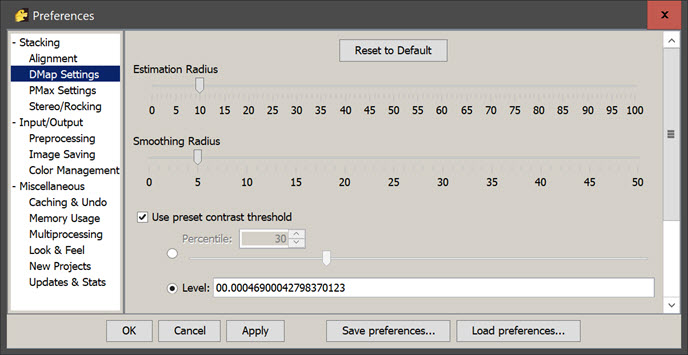
DMap results are also affected by two parameters named Estimation Radius and Smoothing Radius, which can be set in Options > Preferences > DMap Settings. The best settings for these depend on the nature of your images. The default settings are appropriate for typical conditions. Subjects that have simple shapes and a lack of sharp detail will benefit from higher settings (larger radii), while subjects that have unusually crisp, high contrast detail may benefit from lower settings (smaller radii). Typically the smoothing radius should be about half the estimation radius. The very best values for these parameters must be determined by experiment, since they depend on many factors such as magnification, lighting, camera, and lens settings in addition to the type of subject. In particularly troublesome cases, it can be helpful to run DMap two or more times with different parameter settings, and combine those results with retouching.
Retouching
Zerene Stacker’s retouching capability is one of its strongest features. You can quickly and easily merge the best aspects from two or more output stacked images, in addition to merging from individual source frames as commonly provided by other programs. The user interface also provides a tightly integrated set of navigation tools that let you quickly and easily move in depth through the stack, pan and zoom within the image, change brush size, and flash between source and retouched images in the same window.
These capabilities are best learned by watching our video tutorial, Introduction to Retouching.
But just in case you can’t watch the tutorial, here are the key points:
- Select an output image, then Edit > Start Retouching… This internally prepares the image for retouching. It also synchronizes the two image windows, so they automatically stay aligned as the images are zoomed and panned.
- When you are done retouching, you must do an Edit > Commit Retouching to save the retouched version as a new Output Image, or Edit > Cancel Retouching to discard the retouching and go back to normal mode. Several important functions, notably File > Save Output Image(s), are disabled while you are in retouching mode.
- In retouching mode, with no keys depressed, the retouching brush displays as a yellow circle. Rotating the mousewheel at this point changes the size of the brush. The brush size can also be changed by keyboard using the square bracket keys, ”[” to make smaller and ”]” to make larger. Pressing and holding the spacebar gives you a “hand” cursor,
 . While the hand cursor is active, pressing and dragging the mouse pans the image, and rotating the mousewheel changes the image zoom. Pressing the “s” key temporarily displays the current source image in place of the destination image. Quickly pressing and releasing the “s” key will flash between these two images, allowing you to quickly and easily compare specific areas that may need retouching.
- The source image for retouching can be one of the individual input files, or any output image, including the original version of the output image that is being retouched.
- Whenever any of the original input files is selected, there is another convenient tool for finding exactly the one you want. Simply hover the mouse over the source image and press the “Shift” key. This gives you an “up-down” navigation cursor, such as
 ,
,  , or
, or  . When the up-down cursor is showing, pressing a mouse button and dragging up and down will scroll through the stack of input files.
- Most of these features can be combined. For example, you can press the “s” key to show the source image in place of the destination image, while simultaneously pressing Shift and dragging the mouse to select a specific input file. This is particularly useful when the destination image is maximized to occupy the entire working area.
- By combining the keyboard and mouse actions, practiced users can do all of their retouching in a single maximized window, with very little movement of either their eyes or their hands. This is often the fastest and easiest approach to retouching.
After you’ve seen that first retouching tutorial, then there’s a second one you should watch also: Advanced Retouching.
While the first video tutorial focuses on the basic operations of retouching, the second one goes into more depth about how to use these capabilities to get the best results from a more challenging stack of floral photography: close-up honeysuckle blossoms, shot in the wild and moving in a slight breeze.
Stacking Selected Frames
Sometimes the easiest way to deal with a troublesome area is to stack just the input files with that area in focus, then use the retouching tool to merge that output image with an output image for the full stack.
To stack a subset of the input files, simply select (highlight) the files to be included, then Stack > Stack Selected (PMax or DMap). To add files to the selection set, use shift-click (select a range of files), control-click (add one file), and shift-control-click (add a range of files).
Stacking selected frames is a particularly convenient way of dealing with the “transparent foreground” artifact that commonly appears with deep high magnification stacks. The strategy is to do a Stack All first, identify places where the foreground appears transparent, then determine which frames have just that foreground in focus, Stack Selected those frames, and finally retouch from the Stack Selected output into the Stack All output. With a deep stack, this approach can be much faster and less tedious than retouching from individual source frames.
Saving Work In A “Project”
Saving a “project” in Zerene Stacker lets you leave the program, then quickly get back in and resume working where you left off. A project contains links to the input images, values of alignment and brightness adjustments for each input image, copies of the output images stored in a proprietary lossless format suitable for subsequent processing, and most of the Options > Preferences settings that were in effect at the time the project was saved.
Many people never save projects. If you're sure that you have an image completed to the point where you're done using Zerene Stacker, then you can just File > Save Output Image to create a TIFF or JPEG file, and all the other information will be thrown away when you exit the program.
But if you think you might want to do some more retouching, then it's better to File > Save Project until you're sure that you really are done. Some people retain their projects forever; other people delete them at some point to save disk space.
To re-load the project, use File > Open Project. If the project shows as an ordinary folder, then navigate inside the folder, select the file that has extension “.zsj”, and open that.
Batch Processing
Zerene Stacker has a flexible batch facility for unattended execution.
Very briefly, a “batch” consists of a set of tasks to be performed for each of a set of projects or folders (directories) containing source images, combined with some options about how the results are to be saved.
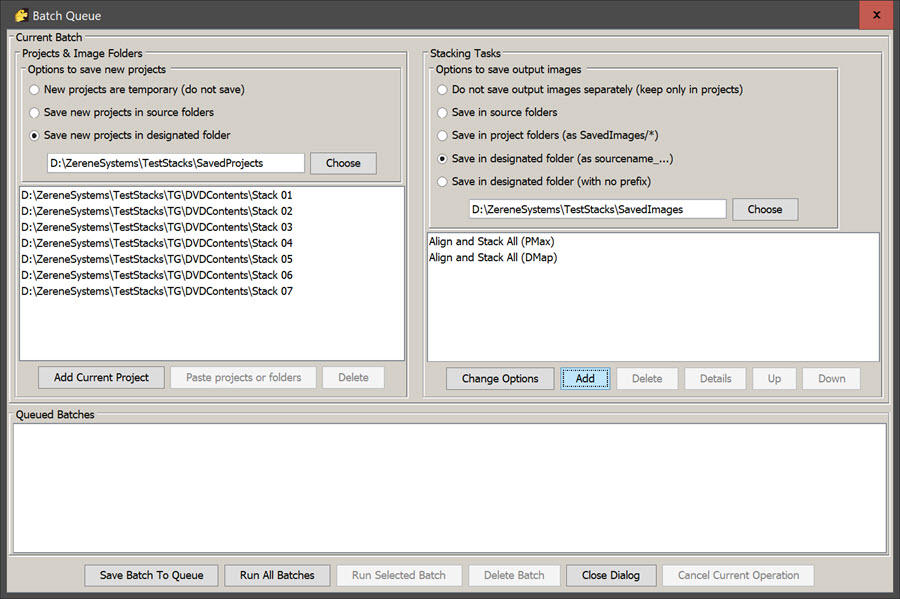
In the following example, the user has defined one batch, consisting of 7 folders of source images. A new project will be constructed for each folder of source images, PMax and DMap will be run within each project, the projects will be saved in a designated location, and output images will be both retained within the projects and written to external files.
Pressing the “Save Batch to Queue” button causes the bottom panel of the Batch Queue dialog to update so that it looks like this:
At this point, pressing the “Run All Batches” button will cause the indicated tasks to be run against the indicated folders or projects. (Note the ordering, “tasks: folders” .)
In the Batch Queue dialog, the “Add Current Project” button has two different uses, as follows:
- If the currently open project has been saved at some point and thus has a well-defined name, then that name is simply recorded. This allows a sequence of batch operations to be constructed incrementally, by opening a project and specifying tasks to be done with it, then opening a different project, specifying tasks for that project, and so on. In this case, the batch queue entries will look something like this:

- If the currently open project is new and has never been saved, then pressing Add Current Project records the target as “%CurrentProject%”. Batch operations defined in this way can be executed on multiple different projects at various times. This feature is particularly useful in combination with Save Batch Script and Load Batch Script. In this case, the batch queue entries will look like this:

Note that each task may have different options (preferences) set for it. The task records whatever Options > Preferences are in effect at the time the Add button is pressed.
The options for a task can be confirmed and/or changed by highlighting the task and pressing Change Options. Options can also be displayed in a textual form by highlighting a task and pressing Details.
For batch usage, the appropriate contrast threshold for DMap is best determined by running a typical stack interactively. Then you can set Options > Preferences to apply that same threshold unattended to all folders in the batch.
The batch capability can also be used to provide an API (Application Programming Interface) that allows Zerene Stacker to be controlled by another application such as ImageJ or a command script. For details, see, Batch API: Running Zerene Stacker From Another Application.
Change Processing Options
Options > Preferences… brings up this dialog. Categories of options can be selected in the list on the left, with corresponding settings changed in the panels on the right. Tooltips are provided throughout, to explain what each of the options does.
Changing the Screen Layout
Except when retouching, you have complete control over the size and placement of the image windows. Each image window can be minimized or maximized (within the overall bounds of the frame) by clicking on the little icons in the upper right corner:  . When a window is maximized, it can be restored to partially fill the frame by clicking a similar icon that appears in the same place:
  . Images can be resized and moved by dragging their edges and title bars.
When the program starts, it used the same layout it had the last time it ended.
If you lose track of windows, you can always select Options > Restore Default Layout to make things sane again.
Synthetic Stereo
A unique feature of Zerene Stacker is its ability to generate stereo and 3-D rocking sequences from a single stack, even when the subject is hairy, bristly, or has complex geometry with overlapping parts. This capability is described in its own documentation page, Synthetic Stereo.
StackShot Controller Interface
Zerene Stacker includes an integrated controller for the StackShot automated rail by Cognisys. This Pro-only feature is described in its own documentation page, StackShot Controller Interface.


